Setting Up a Landing Pages and Sales Letters With WooCommerce
Author's Note: This article was first published in 2015. I've updated in January 2023 to be in line with current best practices.
An effective way to increase eCommerce sales and conversion for a specific offer is to build a simple sales page that eliminates the traditional menus, headers, and sidebars that most websites have. These sales pages, landing pages or sales letters are proven to increase conversion as the customer is made to focus on the value proposition and make a decision.
I use WordPress for my sites, and I prefer WooCommerce for my shopping cart software. Over time, it has become easier to build quality landing pages with WooCommerce and the purpose of this article is to share what I've learned.
Table of Contents
What Didn't Work – Don't Waste Your Time
Many years ago I struggled with custom CSS codes to block out and eliminate everything from the navigation menu and above from view on a specific page. This is not only tedious but also requires a little know-how if you can get it to work at all. Not only is this a painful solution but its also no longer necessary given current plugins and tools.
I would recommend avoiding the various plugins that are dedicated solutions for WordPress landing pages. Some of these are ok, but they often conflict with other plugins and frankly make it difficult to style and lay out your page the way you want it.
The Simple Solution – BB
My recommendation is to use Beaver Builder and use the Beaver Builder Theme. A quick note that Beaver Builder comes in both a free and paid version. Give the free version a try to see if it works for you before purchasing.
Beaver Builder is a drag-and-drop WordPress page builder that will make it really easy to lay out your landing page exactly how you want it.
Beaver Builder, the company, also has a free theme that you can use. The theme is not free but is included with the purchase of the paid version of Beaver Builder. That theme has a landing page template. So for any page that you want to use without the standard site header or footer you can just select the landing page template which they call “No header / No Footer.
Just like that you not only have a “landing page” but you have a way to lay it out and build exactly as desired.
Another Easy Option – Elementor
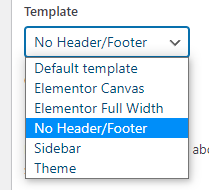
About as good or for some people perhaps even better is the Elementor solution. Elementor is a competitor to Beaver Builder which makes it easy to build and layout your pages using their drag and drop editor. When in use with any compatible theme (and ironically the Beaver Builder theme is compatible) you have some page layout/template options from Elementor.
The effective “landing page” template they call “Elementor Canvas” and you can see it above in the screenshot I took.
Like Beaver Builder, Elementor has a free and a paid option.
The Multiple Themes Option
As an alternative, if you aren't interested in using Beaver Builder or the Beaver Builder theme you can go with the “multiple theme” option.
The basic idea here is that you have your primary WordPress theme which you use for most of your website and then a separate theme which is optimized for your landing pages and only used on those pages.
Then, using the Multiple Themes plugin you can designate some sort of URL parameter to tell WordPress to load your landing page theme on landing pages. For example, you can program to load the alternate theme when the URL starts with https://www.yoursite.com/landingpage or whatever you want it to be.
The Integration with WooCommerce
There was a time many years ago, when it was my preference to embed a checkout form right on the landing page and some of you may be inclined to do that. If inclined I recommend using the WooCommerce One page Checkout plugin.
I'm more inclined these days to add an add-to-cart button or image that lives on the landing page and when clicked takes the user to checkout.

You can use the default checkout by simply using an “Add to Cart URL” for the product you are selling. This is a native and built-in Woocommerce feature. You first need to identify the product ID of the product you are selling on your page.
Then build the add to cart url following this example: http://www.yourdomain.com/cart/?add-to-cart=67
Where 67 is the product ID. This URL will take the customer directly to your cart and add product 67 to the cart.
As an alternative, you can replace “cart” with “checkout” and take the customer directly to checkout.
You can also create direct URLs for specific variations on products that have variations. An example would be:
http://www.yourdomain.com/cart/?add-to-cart=67&variation_id=3721&attribute_pa_left-or-right=right-handed
Where:
67 is the product ID
3721 is the Variation ID
“left-or-right” is the variation slug
“right-handed” is the slug for the specific variation option to be added to the cart
If you prefer to use one of the built-in WooCommerce Add to Cart buttons you can use a shortcode like this:
Here are a list of other WooCommerce default shortcodes.
FunnelKit Is An Even Better Solution
FunnelKit (formerly WooFunnels), is a WooCommerce extension that allows you to build custom checkout pages. You can prebuild the checkout page with the product(s) desired and include testimonials/reviews, and other sales copy or images etc. This takes all the guesswork out of the shortcode builder described above while also increasing the conversion rate through design and customization.
FunnelKit is not a free product but will pay for itself very quickly. In addition to the custom checkout pages FunnelKit also makes it easy to add “bump offers” on the checkout page and one-click upsells.
Conclusion
For your landing pages consider Beaver Builder or Elementor paired with a quality and compatible theme. The Beaver Builder theme is probably a good option.
For checkout, you can embed the checkout form on your landing page using the One Page Checkout plugin or by linking to the checkout page using a custom add-to-cart URL or by using FunnelKit custom checkout pages.